Setting up a successful center system and routine doesn’t have to be difficult, in fact, you can set it up in 3 easy steps. Having a manageable system in place for learning centers in the classroom will make that time easier to maintain. Plus, it will encourage student independence so that, over time, your centers run themselves. Here are some learning centers in the classroom examples to make it all easier.
Tip #1: Display a Digital Rotation Board
A digital rotation board can be a game-changer for managing learning centers in the classroom. It keeps transitions smooth, helps students know exactly where to go, and saves you from endless interruptions. It doesn’t matter if you’re running reading groups, math stations, or science activities. This tool keeps everything organized and flowing. Ready to see some learning centers in the classroom examples where a digital rotation board makes all the difference?
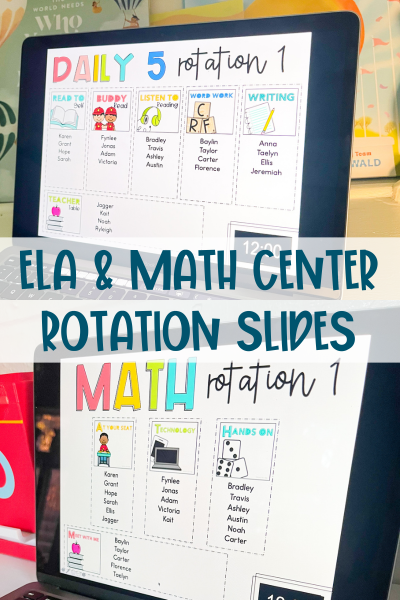
First up, is sorting your students into groups and displaying them on a digital rotation board. Like the one above one. You want a board that is easy for students to see and understand. The inclusion of timers on each slide allows for students to begin learning time management. It also keeps you on track during your center time.
When grouping students, you can either have them move together as a group from station to station or you can use a more student-led approach by grouping them for your teacher’s table but then allowing them the choice of when they go to the other centers. This is a Daily 5 approach. It allows students to work with different peers throughout center time and gives them a little more autonomy over their day.
Once grouped, add student names to the digital rotation slides, add the timer for the length of the center, and you are set. Student names and center titles will be displayed on the board. No more repeating over and over where students need to go.
Adding transition and clean-up slides can add to the ease of centers because once the rotation slide is done, the slide switches to a transition slide if you are moving to another center (students make their center area ready for the next group) or to a clean-up slide if you are done with centers for the day and need to clean up. This notifies students that it is time to start picking up their items and allows you to continue to focus and clean up with your small group rather than running around trying to get students to put their items away.
Tip #2: Have Reusable Activities
Reusable activities are a teacher’s best friend when it comes to keeping learning centers running smoothly. They save time, reduce prep work, and ensure that students stay engaged without reinventing the wheel each week. From task cards to games and hands-on manipulatives, there are countless ways to incorporate reusable options into your rotation. Here are some learning centers in the classroom examples for reusable activities.
Laminate your centers! When you laminate centers, they are more sturdy for your students when they are completing the activity, but they also last longer. You are able to use them multiple times a year and even throughout multiple years.
Centers like these Build A Sentence Writing Centers can be laminated, the sentence cards cut out, and stored in these plastic file folder pouches and used from year to year.
Having reusable center activities also allows you to be able to differentiate your centers to your student’s needs. You can have a group of higher-level students using the center closer to the beginning of the year, and then later on in the year, another group of students using the same center. If you are going to invest in something for your classroom, a laminator is one you will use a lot! And if you get a good one, it will last! Mine is a dinosaur! It’s over 20 years old and still going!! Check out these great options for laminators and laminating sheets! Here are some other Amazon Must-Haves, too!
Tip #3: Routine Centers
Routine centers are the secret sauce for keeping learning centers in the classroom stress-free and effective. By using familiar activities that students know and love, you can minimize confusion and maximize learning time. Think of these as your go-to options that require little explanation but pack a big punch.
Routine centers are centers that have the same instructions and concepts but the skill changes throughout the year. Centers like these Mystery Picture Puzzles are an example of a routine center I use within my own classroom in my word center rotation. With different skills to focus on, like CVC words, CVCe words, blends, digraphs, vowel teams, and more, there are skills students can work on throughout the entire year. You spend a couple weeks teaching your students the center and then they know how to complete the puzzles for the whole year and can simply focus on the new skill they are learning.
These kinds of center activities create structure, routine, and consistency in your center time.
You aren’t spending a bunch of time always teaching new centers with different instructions on how to play. This not only saves you time but also allows your students to feel more confident completing the center activity because they have done something similar before. They can focus on the ELA or math skill they are working on rather than trying to figure out how to complete the center.
Implementing these three steps on simplifying your center time will not only make center time an easier and more productive time in your classroom and for your students, but it will also save you hours of prep! You won’t be spending time each week having to figure out new centers, creating those centers, and then teaching them. Creating a center time that is structured, organized, and a simple routine for you and your students to follow will allow your center time to go from something that is overwhelming and stressful to a time that basically runs itself!


